GFXVoid Graphic Design Forum

Remove Text Formatting
Loading...

» Online Users: 9,656

0 members and 9,656 guests
No Members online

» Site Navigation

 > FAQ

» Stats

Members: 35,442
Threads: 103,075
Posts: 826,688
Top Poster: cc.RadillacVIII (7,429)
Welcome to our newest member, Lekelindids
Page 1 of 3 123 LastLast
Results 1 to 10 of 28
  1. #1
    Join Date
    May 2006
    Posts
    9

    Default

    Step 1: Create a document 400x400 with a transparent background click ok and press D

    step 2: Filter> Render > Clouds

    step 3: Ctrl + F (repeat) a couple of times (to even it out)

    step 4: Filter> Render >Difference Clouds

    step 5: Ctrl + F (repeat) a couple of times (to even it out again =P)

    step 6: Ctrl +I (Image > Adjustments > Invert)

    step 7: Ctrl + J (Duplicate layer)

    step 8: Select the new layer and do Filter > Distort > Twirl

    Settings: Angle= 500

    step 9: Set layer blending options to Multiply

    (Right click on the layer in the layers window and click Blending Options

    then you will see General Blending, Blend mode: Normal, click on that

    and scrolldown to Multiply)

    Step 10: Ctrl + E (Merge layers)

    Step 11: Ctrl + J (Duplicate layer)

    step 12: Again select the new layer and do Filter > Distort > Twirl

    Settings: Angle= 500

    step 13: Again set layer blending options to Multiply

    (Right click on the layer in the layers window and click Blending Options

    then you will see General Blending, Blend mode: Normal, click on that

    and scrolldown to Multiply)

    Step 14: Ctrl + E (Merge layers)

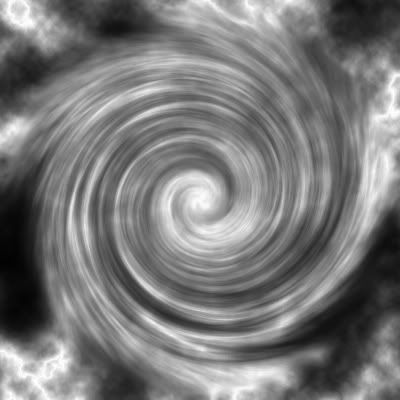
    Note: You should have something that looks like this by now. you can choose to stop
    here and skip to step 25.


    Step 15: Ctrl + J (Duplicate layer) =P dont worry these are the last ones hehe

    Step 16: Filter > Distort > Pinch

    Settings: 50

    Step 17: Ctrl + F (repeat) a couple of times (to even it out)

    step 18: Set layer blending options to Darken

    (Right click on the layer in the layers window and click Blending Options

    then you will see General Blending, Blend mode: Normal, click on that

    and scrolldown to Darken)

    Step 19: Ctrl + E (Merge layers)

    Step 20: Ctrl + J (Duplicate layer)

    Step 21: Filter > Distort > Pinch

    Settings: 50

    Step 22: Ctrl + F (repeat) a couple of times (to even it out)

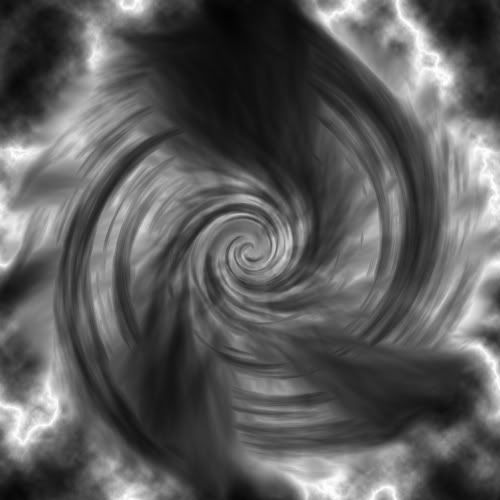
    Note: By now you should have a nice tornao effect that looks something like this. Again
    you can choose to stop here and skip to step 25 or finish the rest of the tut.


    step 23: Again set layer blending options to Darken

    (Right click on the layer in the layers window and click Blending Options

    then you will see General Blending, Blend mode: Normal, click on that

    and scrolldown to Darken)

    Step 24: Ctrl + E (Merge layers)

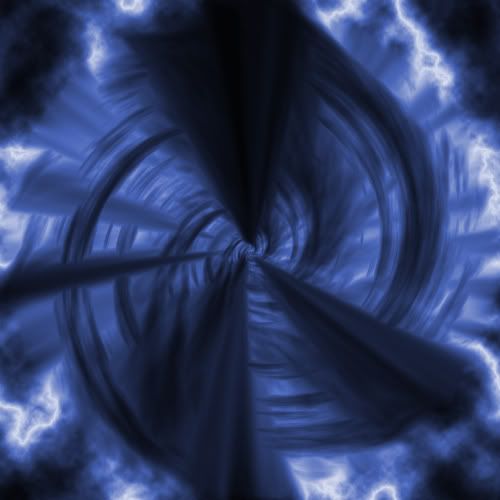
    Step 25: Ctrl + U (Change Hue/Saturation) dont forget to select Colorize

    Note: Most of the steps i repeated are there for the sake of randomness to make the effect different,
    you can do the repeat as many times as you want or you can do it not at all to get
    the desired effect. =P

    Here is my finished product (enjoy):


  2. #2
    Join Date
    Jun 2005
    Posts
    4,178

    Default

    Looks nice, maybe a few more screenshots though.

  3. #3
    Join Date
    Nov 2005
    Location
    New York
    Posts
    167

    Default

    Pretty cool. Reminds me of the Sharinghan.

  4. #4
    Join Date
    May 2006
    Posts
    18

    Default

    That look cool, going to try it now.

  5. #5
    Join Date
    May 2006
    Posts
    18

    Default

    Ok I tried it with 2 size's.


    tell me where I went wrong,

  6. #6
    Join Date
    May 2006
    Posts
    9

    Default

    im thinking you skip'd the pinch thingy a few times or you changes the pinch settings =\

  7. #7
    Join Date
    May 2006
    Posts
    18

    Default

    <div class='quotetop'>QUOTE(HellBringer &#064; May 16 2006, 08&#58;09 PM) [snapback]168714[/snapback]</div>
    im thinking you skip&#39;d the pinch thingy a few times or you changes the pinch settings =&#092;
    [/b]
    Thank you, I knew I missed something, forgive an old man, will try again.


  8. #8
    Join Date
    May 2006
    Posts
    9

    Default

    hey this last one you posted wasnt too bad maybe duplicate that layer change the color to a lighter shade of blue like sky and set the blending to darken or lighten and merge layers i be that would look pretty nice =P

  9. #9
    Join Date
    May 2006
    Posts
    18

    Default

    <div class='quotetop'>QUOTE(HellBringer &#064; May 16 2006, 10&#58;23 PM) [snapback]168725[/snapback]</div>
    hey this last one you posted wasnt too bad maybe duplicate that layer change the color to a lighter shade of blue like sky and set the blending to darken or lighten and merge layers i be that would look pretty nice =P
    [/b]
    Thank you for your kind words and your Great tips&#33;&#33;&#33;&#33;&#33;&#33;[color=#FF0000]

  10. #10
    Join Date
    May 2006
    Posts
    9

    Default

    hey check out what i did to yours =P
    i used fireworks to edit this one btw


Similar Threads

  1. Tornado Damage
    By Freak in forum Sigs & Manips
    Replies: 5
    Last Post: 09-26-2005, 10:15 PM
  2. Tornado
    By Dale in forum Digital Art
    Replies: 9
    Last Post: 05-19-2005, 10:25 AM
  3. Nice new sig
    By GreeneBeast in forum Sigs & Manips
    Replies: 8
    Last Post: 03-29-2005, 04:31 AM

Posting Permissions

  • You may not post new threads
  • You may not post replies
  • You may not post attachments
  • You may not edit your posts
  •  
Powered by vBadvanced CMPS v4.1.1