0 members and 834 guests
No Members online

» Site Navigation

» Stats
Members: 35,442
Threads: 103,075
Posts: 826,688
Top Poster: cc.RadillacVIII (7,429)
|
-

After doing some experimentation, I came-up with a few small and simple yet effective things to do to an image when sending an ode to a loved one or someone important to you.
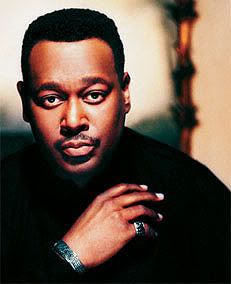
1. Of course, start by opening an image. I decided the use of a well-known celebrity would be best so to make this tutorial more of a global feelings where many people can relate. For this tutorial, I will be using an image of the passed-on Luther Vandross.
2. First off, duplicate your layer, by either right-clicking on the layer and selecting "duplicate layer" or by pressing ctrl+J. To the duplicated layer, go to Filter>Blur>Gaussian Blur and add a 3px blur to the image. Then change this layer from "normal" to "screen." Change the opacity to 80% (or what seems most suiting to your image) so the effect isn't too intense. This gives the subject a glowing, angelic-like effect.
3. Press D on your keyboard to make sure you have the default colors, then select your gradient tool from the tool box. (If your gradient does not show but you see a paintbucket, hold down on the paintbucket until the option to change it to "gradient" appears, then select gradient to change to the gradient mode.) With the gradient tool selected, go to the top toolbar, and click on the bar (A) and when a box appears, choose "foreground to transparent" and then press ok. Make sure you have "radial gradient" selected, as well *B* and that "reverse" is checked *C*. (I had to use the ** instead due to it would change to a symbol.)

4.With the duplicated layer still highlighted, either go to Layer>New>Layer or click on the button on the bottom of the layers palette that is a square with a bent corner. Use the gradient on that layer, starting from the face of the subject and going to the corner or side of the image (whichever is more suiting...I went from the face to the bottom-right corner). If too intense, lower the opacity somewhat. I lowered mine to 80%. This effect brings the majority of the immediate focus to the subject's face, yet still allowing the rest of the image to be visible.
5. The last, but definitely not least, part, the text is added. I suggest a fancier writing, especially cursive, since it gives a personal and emotional feeling to it. I suggest Edwardian Script ITC. Make sure to change your text to white (unless a different color seems more suiting, but I find white to be the best).
6. Next, either right click on the text layer and select "blending options" at the top or double-click on your text layer. If it instead highlights the words, change the name to something short, such as "text" or "words," press enter/return, then double-click again but away from what you entered so it doesn't re-highlight the layer name for edit. With the blending options box open, select "outer glow" and make sure the outer glow editing options are open. Play around with the effects until the words are attractive and you like the changes. I found that the best for my image was to leave at default except lower the opacity to 50%. When you're done, press ok.
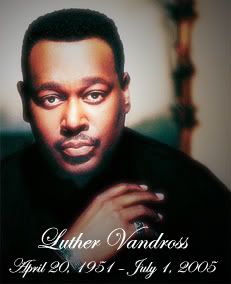
Add any more effects or edit what you have if desired. When complete, you should have an attractive and suitable image to use to remember the departed.
<div align="center">Final Result:</div>
<div align="center">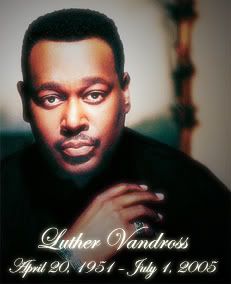 </div> </div>
Similar Threads
-
By BLiZZ in forum Sigs & Manips
Replies: 9
Last Post: 10-23-2005, 07:32 PM
-
By DragonsRage in forum Digital Art
Replies: 9
Last Post: 08-31-2005, 07:16 AM
 Posting Permissions
- You may not post new threads
- You may not post replies
- You may not post attachments
- You may not edit your posts
-
Forum Rules
|


 Reply With Quote