0 members and 1,036 guests
No Members online

» Site Navigation

» Stats
Members: 35,442
Threads: 103,075
Posts: 826,688
Top Poster: cc.RadillacVIII (7,429)
|
-
 Fire Orb Tutorial Fire Orb Tutorial
Hi everyone, this is my first tutorial EVER...sorry it's a bit long, but a lot of it is just details. Feedback would be much appreciated!
Well be starting with a new document, 200x200 pixels with a transparent background. Change your foreground and background colors to dark gray colors, making sure that the background is darker. I used 505050 for the foreground and 303030 for the background. Next, grab the Gradient tool and use these settings:

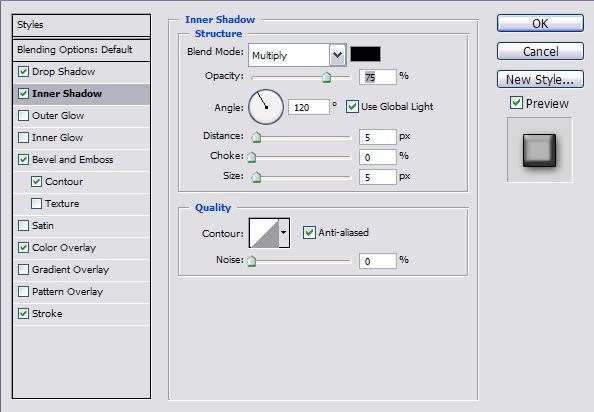
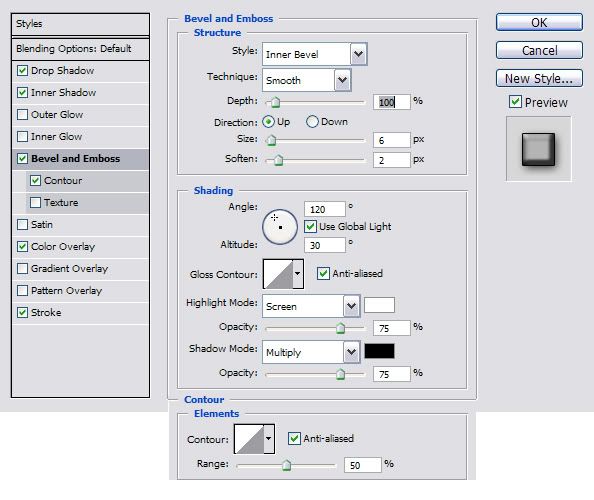
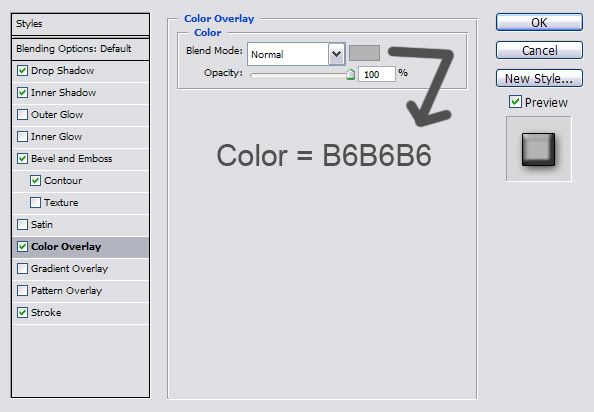
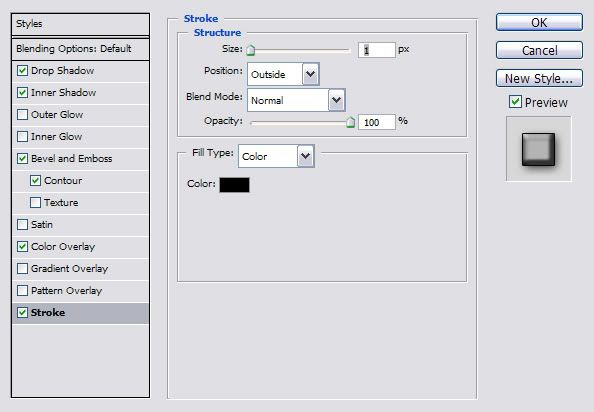
Click & drag your gradient tool from the middle of the top of the document to the bottom while holding shift [to keep a straight line]. This should create our background. Create a new Layer by going to Layer>New>Layer [or by clicking on the 2nd to last button on the bottom right corner of the Layers Palette]. Now for the fun part! Grab the Elliptical Marquee tool [click & hold the square marquee tool button if you dont already know]. Next, holding shift, make a circle in the middle of the document about ¾ of the documents size. [Make sure this is on the new layer!] Next, do the same thing we did to the background with the gradient tool to the circle selection we just created. Hit Ctrl+D to deselect. Next, go to the layers blending options [Layer>Layer Style>Blending Options] and use the following settings:

Now you should have something like this:

Ok, so now that we have that part finished, its time to move on to the cool part. Make a new layer, and grab your brush tool. Find a cool brush to use, something that will take up about 2/3 of the circle. For the sake of this tutorial, I will be using Alterna666s Fire Brush Set, which can be found on deviantART. Take the brush that youve chosen and, making sure this is on the new layer you just created, put the brush so that the bottom of it aligns anywhere from the middle to almost the bottom of the circle, about ¾ of the way down is ideal. Next, take a 3 pixel black solid brush and while holding shift, draw a line from one end of the circle to the other, making sure that the line crosses through the bottom of the brush, like an underline. Now we have to make the screen part of this thing. Ctrl+Click on the circle layer [on the little picture], loading the selection. [Make sure that your brush layer is still selected] Next, go to Select>Modify>Contract and contract the selection by 11 pixels. Dont deselect yet! Go to Select>Modify>Border and border the selection by 3 pixels. Fill the border with your foreground color [alt+backspace or edit>fill]. Now you can deselect [Ctrl+D]. Next, take your eraser tool and erase all of the lines on the brush layer that are below the original brush and outside of the circle we just made, creating a sort of half circle like the one below:

Almost done! Now grab your Magic Wand tool and click inside the circle on the area between the circle and the original brush. It should select an area around the original brush, but inside the half circle, like a window. [If you did the same thing as I did, you may have to zoom in and fully select the areas manually because the top of the circle connects with the brush] Ok, lets finish this up! With the window still selected, click on the circle layer and hit delete. This should create something like this [you can deselect to see it better]:

Now for the last few steps [finally]! Ctrl+Click on the circle layer to load the selection once again. Youll notice that since we deleted parts of it, it has a hole in it. No problem! Get out our trusty Circular Marquee tool and at the top settings, click the 2nd of the 4 boxes. This allows the selections you make outside of another selection to be added to the original one. So, that having been said, select all of the selections inside of the big selection, adding the selections together to make one big selection [selection count: 5]. Look familiar? Yep, its our original circle! Now, create a new layer underneath the circle layer. With the selection still loaded, fill the circle selection on the new layer with the color 810000. It should make the window turn a dark red. Now, for the last part, on the red circle layer you just created, bring up the Blending Options again and click on Inner Glow. Use these settings:
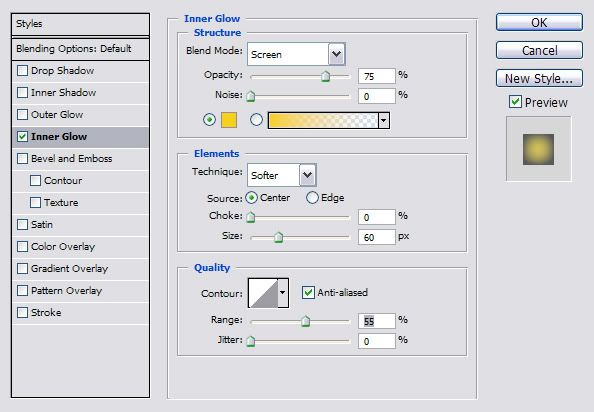
And youre done! w00t!
If you want to, you can make the silver part of the circle darker by clicking on the 1st Circle layer we made, and in the blending options, change the Color Overlay color to a darker gray/black. It comes out more like this:

Also, with the final images I got, I deleted the layer that we brushed on so that the brush strokes dont show. I think it looks better, but its totally up to you. Also keep in mind that yours will look different if you used a different brush. This is with the Brush Layer removed:

This is what I got if I didnt remove the Brush layer:

Of course, there are other things you can do to this to make it cooler, like changing the glow settings for more of an effect, but its really all to taste. I tend to make the best things when I dont know what the hell Im doing. 
-
also, it would be helpful if someone could explain to me how to make the window a little more circle-like instead of looking like an octagon.
-
Actually I dunno why it does that = Try enabling pixel doubling, seef that works. Or try using I higher resolution when you open the document.
-
hold shift and drag the circle marquee.
Similar Threads
-
By pinklemonade in forum Other Tutorials
Replies: 40
Last Post: 06-25-2009, 05:34 PM
-
By iceryu in forum Other Tutorials
Replies: 29
Last Post: 06-08-2009, 05:11 AM
-
By sceptileex in forum Other Tutorials
Replies: 30
Last Post: 07-12-2005, 03:08 PM
-
By SeasonalWeasel in forum Other Tutorials
Replies: 21
Last Post: 06-26-2005, 07:09 PM
 Posting Permissions
- You may not post new threads
- You may not post replies
- You may not post attachments
- You may not edit your posts
-
Forum Rules
|


 Reply With Quote

