0 members and 6,116 guests
No Members online

» Site Navigation

» Stats
Members: 35,442
Threads: 103,075
Posts: 826,688
Top Poster: cc.RadillacVIII (7,429)
|
-
 First Signituare Tutorial First Signituare Tutorial
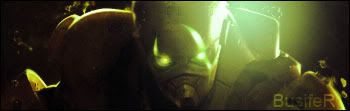
Hi, well earlier i made a really cool Halo Signituare for someone i know called Ariaganos, here is a preview of your Final Product:

So what you do first is get a good Halo Render from PlanetRenders.net
Step 1: Create a New document about 450x150 (That's what i used)
Step 2: Open up your Render, and Resize it using Image--> Image Size--> Resize the width to about 250-650pixels then the height will automatically adjust!
Step 3: Work out the position of the Render, where you want to put it, if it is still to big then Resize it again!
Step 4: Get the Linear Gradient tool, and chose foreground colour as a Dark Green and the background colour as a Black, use the Linear gradient all the way from the left middle to right middle, you should now have a base, go to Layer-->Layer Settings-->Blending Options
Step 5: Tick all boxes except the Gradient, Pattern and Colour Dodge, then go back to Blending Options and go to Bevel and Emboss, change the top settings to Inner Bevel, Chisel Hard, 1000% and a size of 2 pixels, then go to Texture and chose the texture you like, then go to Stroke and chose from the dropdown box Gradient, then the gradient drop down box and chose the current gradient you are using, then set size to 2 and ok!
Step 6: We are almost done now! Now for the Text - Of course for mine i put Ariaganos for it is my friends username, who i made this for, also, in the Layer box, you should have 2 Layers there, Your Gradient (Green to Black) and the other as your Render, when you add text using photoshop, it adds a new layer, search through the Effects (Like Overlay, Normal, Hard Light, etc etc) and when you find the one you like, keep it like that!
Step 7: If people get there hands on your file they can save it and mess up loads of things, so what we do, is:
Ctrl+A to select all
Ctrl+Shift+C to copy all
Ctrl+V to paste
Now you will be given a fourth layer, it will have your finished product on, delete the first 3 layers containing the text, render and gradient, and save it as a JPEG image and set the quality to 12, then upload it to Photobucket, never imageshack (sometimes imageshack stuff is deleted) and then post it for your friends to see, please post your end result here
Step 8: If you don't like Halo, you don't have to use a Halo Render, you can search for a different render and chose different colour or texture settings, now post your results here!
My Result Was:
I hope you like it, C+C please, don't forget its my first Tutorial and im only Novice 
-
nice
Nice work, man. You really should consider making money of of this.
-
cool, but no, there for free to friends, and i have no paypal
-
I'm gonna break it to ya man, you shoulda waited until you become a bit better in photoshop before making a tutorial. Very few people on these forums will need to make use of this tut. :/ Sorry If i sound like a dick lol. >.<
-
oooh i wanna be so good! how long have u been using photoshop??
My New

I like Dark
-
 Originally Posted by Dycro

I'm gonna break it to ya man, you shoulda waited until you become a bit better in photoshop before making a tutorial. Very few people on these forums will need to make use of this tut. :/ Sorry If i sound like a dick lol. >.<
Well its not rude, its the truth.
Many people will learn a lot more from more experienced people and tuts...
You need to read more tuts yourself before making them i guess...
Not that i don't like the tut, but it's just that the sig used is quite 'beginner' if you get what i mean :P
-
where did u get the render for ur sign RaD?
My New
I like Dark
-
-
Originally Posted by Igelkotten
where did u get the render for ur sign RaD?
I used this picture (stock):
http://www.mypicshare.com/hfyeivsnpic.html
And changed it in PS and stuff.
-
 Posting Permissions
- You may not post new threads
- You may not post replies
- You may not post attachments
- You may not edit your posts
-
Forum Rules
|


 Reply With Quote