0 members and 4,939 guests
No Members online

» Site Navigation

» Stats
Members: 35,443
Threads: 103,072
Posts: 826,684
Top Poster: cc.RadillacVIII (7,429)
|
-

This tutorial will show you how to create a cool background and give it a cool abstract ice effect.
1) Create a New Document, for this tutorial I used 400x400 with 300 resolution. Fill your background with black.
2) Next, we are going to add some lens flares. Go to Filter/ Render/ Lens Flare and add a few lens flares with similarity to this, or be creative and do another pattern.

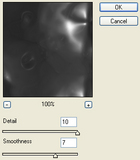
Then, we will chrome out this image. Go to Filter/ Sketch/ Chrome and use these settings:
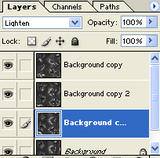
3) Now we are gonna make this image come to life. Duplicate the image 3 times. On the top two layers do the following alterations:
a) Filter/ Distort/ Wave <use the Default settings and hit the "Randomize" button, now click OK.
B) Set Blend Mode to "Lighten".
On the third layer from the top do these alterations:
a) Filter/ Distort/ Wave <set Type: Triangles and hit the "Randomize" button, now click OK.
B) Set Blend Mode to "Lighten".
 and and 
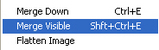
4) Hit Shift+Ctrl+E (Merge Visible Layers) or select it from the Layer menu
We are gonna give this image some color now, so lets Image/ Adjustments/ Hue/Saturation and do the following:
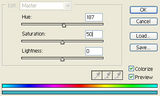
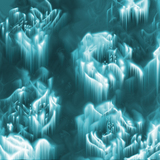
Your image will come out something like this
5)Time to add the final alteration, ice. Select Image/ Rotate Canvas/ 90 CW. Now, Filter/ Stylize/ Wind... When You have done that, Image/ Rotate Canvas/ 90 CCW.
This is your final image:
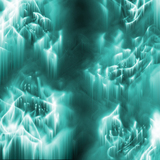
Here is another alteration, since all images won't come out the same way. I used different hue/saturation settings.
I hope you enjoyed this tutorial, it is very quick and easy.
-
Wow dude, that looks great dude! Is it ok if I submit it to a few tutorial websites?
I also edited it a bit so all the images would show up - I got some odd error at first but I went and debugged the rest of the code and figured it out. Thanks man!
-
Yeah go ahead. Anything I post you can submit it.
-
looks like fireworks... nice
-
Originally posted by soniclnd@Jan 22 2005, 11:08 PM
looks like fireworks... nice
[snapback]1771[/snapback]
To me it looks a lot like electric flowers or something. One of my favorite tutorials =).
-
Yeh i agree with TacoX, on eof my favourties aswell. I made a picture for my band with it ^.^
-
cool as tut , so aweseome!!!!
-
Incredible, I've always wanted to learn theese things :P 10/10 points to this tut. You're my idol 
-
If you made the colorize red, it could be a valentines day thing, also. Pretty nice. Simple, yet good outcome... My favorite XD
-
Similar Threads
-
By tacoX in forum Other Tutorials
Replies: 50
Last Post: 09-27-2008, 09:50 PM
 Posting Permissions
- You may not post new threads
- You may not post replies
- You may not post attachments
- You may not edit your posts
-
Forum Rules
|


 Reply With Quote


