0 members and 4,368 guests
No Members online

» Site Navigation

» Stats
Members: 35,442
Threads: 103,075
Posts: 826,688
Top Poster: cc.RadillacVIII (7,429)
|
-
 Lightning Background/ Sig Lightning Background/ Sig
1. Create a 600 x 200 document. Press 'D' to set to default.
2. Press Alt + Backspace to fill document.
3. Filter > Render > Clouds
4. Filter > Render > Difference Clouds
5. Ctrl + I to invert colors.
6. Press Ctrl + L and and settings should be: Click ok.
Input Levels: 0, 0.10, 255
Output Levels: 0, 255
http://s44.photobucket.com/albums/f1...gAnch=imgAnch6
7. Create a new layer.
8. Press Alt + Backspace to fill document.
9. Filter > Render > Clouds
10. Filter > Render > Difference Clouds
11. Ctrl + I to invert colors.
12. Press Ctrl + L and the settings should be: Click ok.
Input Levels: 0, 0.10, 255
Output Levels: 0, 255
http://s44.photobucket.com/albums/f1...gAnch=imgAnch5
13. Create a new layer.
14. Press Alt + Backspace to fill document.
15. Filter > Render > Clouds
16. Filter > Render > Difference Clouds
17. Ctrl + I to invert colors.
18. Press Ctrl + L and the settings should be: click ok.
Input Levels: 0, 0.10, 255
Output Levels, 0, 255
19. Change this layer to 'screen'
20. Press Ctrl + E to merge down.
http://s44.photobucket.com/albums/f1...gAnch=imgAnch4
21. Create a new layer.
22. Alt + Backspace to fill document.
23. Filter > Render > Lens Flare. Place torward the left side of the picture.
Click ok.
24. Fliter > Sketch > Chrome. Set settings to:
Detail: 10
Smoothness: 0
Click ok
25. Go to Filter > Distort > Twirl. Set settings to:
Angle: 50
26. In the Layers Palette: Swap Layer 1 with Layer 2. (Drag and drop)
27. Change Layer 1 to 'Color Dodge'
28. Ctrl + E to merge down.
http://s44.photobucket.com/albums/f1...Frozentut4.jpg
29. Now if you want you can add, edit, or add text to the picture. (Make sure you merge the text layer down to Layer 2.)
30. Press Ctrl + U and check 'Colorize' and play around with hue/saturation. I used:
Hue: 205
Saturation: 45
Lightness: 0
Click ok.
31. Press Ctrl + Shit + E to merge all the layers together.
http://s44.photobucket.com/albums/f1...Frozentut5.jpg
And now you have yourself a nice little lightning background/ sig. Here is my final result:
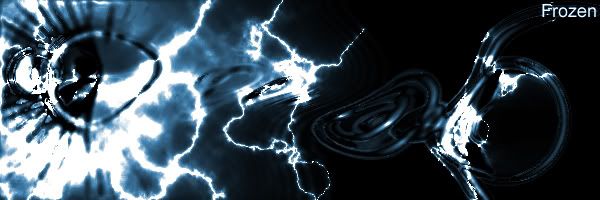
Post your results here too!
Note: First tutorial, so give me some comments on how i did 
Last edited by Frozen; 08-27-2006 at 03:01 PM.
-
sick effect. i like it, minus the right side that looks a little, eh, idunno. need more screenies though!
-
i just edited it with a screenie for each step. like i said its my first tut. but look at it now and it should be better.
-
sweet man! already a major improvement!
off-topic...
i really like your desktop theme. it's so raw man!
-
-
I love this i need to try it..... Cant wait.. Will post mine when i done! 
-
This is very cool. Very easy to follow, and it gave me tons of other ideas. Congrats.
Here's my result.

Last edited by sadisticlaughter; 02-18-2007 at 02:45 AM.
 Live and let live.
-
Good tutorial. I made my own and added wind effects to make it look like ice. Here is a picture

-
Im a n00by (we all are at one point...) the problem is when i press ctrl E on step 28 layer 3 doesnt and layer 1 is merged in it... o and layer two is just lighting similar to this http://s44.photobucket.com/albums/f12/GDNEddie/Frozen%20Tut/?action=view¤t=Frozentut1.jpg&refPage=&imgAn ch=imgAnch6
Last edited by Sign00b; 08-16-2007 at 09:13 AM.
-
Similar Threads
-
By Freak in forum Sigs & Manips
Replies: 4
Last Post: 12-23-2005, 02:43 PM
 Posting Permissions
- You may not post new threads
- You may not post replies
- You may not post attachments
- You may not edit your posts
-
Forum Rules
|


 Reply With Quote